Add a SiteHost POP3 account in Outlook Express

- Open your "Accounts" from your "Tools" menu in Outlook Express
- Click "Add" -> "Mail"
- Enter your name (the name you wish people to see when they receive an email from you), then "Next"
- Enter your email address as provided by us, then "Next"
- My incomming mail server is a "Pop3" server
- Incoming mail (POP3, IMAP or HTTP) server: mx1.sitehost.co.nz
- Outgoing mail (SMTP) server: mx1.sitehost.co.nz
- Click "Next"
- Account name: fill in your email address as provided by us
- Password: fill in your password as provided by us
- Do not change other options - Click "Next"
- Click "Finish"
Modify the advanced properties
This will bring you back to the "Internet Accounts" screen. In this screen, click the "Mail" tab and you should see an account called "mx1.sitehost.co.nz". Click on this, followed by the "Properties" button on the right.
 Open the "Servers" tab, and you will see the settings you just filled in.
- Add a tick next to the "My server requires authentication"
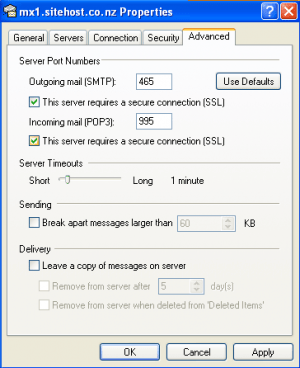
- Open the "Advanced" tab
- Add two ticks in "This server requires a secure connection (SSL)" below both the "Outgoing mail (SMTP)" and "Incoming mail (POP3)
- Change the "Outgoing mail (SMTP)" number to 465
- Make sure the "Incoming mail (POP3)" number says 995
- Click "Apply" then "OK"
- This will bring you back to the "Internet Accounts" screen.
- Click close and you're done!